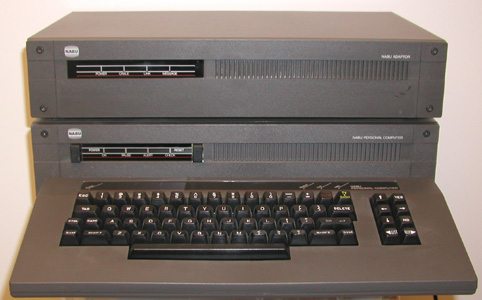
The first order of business was to figure out a box to house it in. I found a surplus site that had tons of stuff and in particular a discontinued product from the early 80's called a NABU Network adapter. It's was basically a method to connect personal computers together in a network using cable TV technology - think of a network adapter that has a channel 3 transmitter / receiver built in (like a VCR). I guess it never took off because IBM came out with a different system that became the industry norm. So there's a warehouse somewhere with thousands of these boxes just waiting to be re-purposed!
I decided to use a leftover prototype PCB I had made for my previous headphone amp / preamp project (written about elsewhere here) for the basis of the design. I basically adapted the PCB layout to the mic pre schematic I had previously worked out, with a few twists. In building this project I actually found a few better ways of building that mic pre from 15 years ago.. I guess we learn a few things along the way, even if we are old!
The design features transformer balanced XLR (mic) and 1/4" (unbalanced line) inputs, transformer coupled balanced outputs, a 12dB pad and 48V phantom power on the mic circuit. The B+ and filament power supply are fully regulated. The circuit is a two stage design with the volume pot between stages. There is a mic / line switch, a power switch and a bright red LED. The circuit uses 12au7a tubes for gain, one per channel.
I wanted to keep things simple and inexpensive so I tried to use as many parts on hand I could find. I ended up ordering a few resistors, pots, switches and output transformers, in addition to the NABU box. The rest was from the spare parts bins and leftover parts from ESA products. The input transformers are fully shielded in mu-metal cans and are terminated in a 7-pin setup that required special 7-pin sockets. These I pulled from an old TOA mixer that was being thrown out some time ago at my job. (I work in Audio Visual and have to opportunity to 'scrounge' lot's of cools stuff).
For this design I decided to inject the line-in signal to the first stage amp and switch the signals between line and mic with a DPDT toggle rather then using shorting 1/4" jacks as I had done in the previous design, where the line signal was injected directly to the volume control between the first and second stages. Also, I changed the pad value from 18dB on the original to 12dB on the new design. The phantom power supply was also improved; this time I employed a 'floating' regulator - an 18V regulator chip that came with the NABU, floating on a 30V zener, supplied via a voltage divider off the B+ supply.
The circuit design is basic. The mic signal first routes to the front panel for the 12dB pad switch, then to the input transformer where it gets a 20dB boost via the turns ratio. The line input goes through a 6dB pad to insure plenty of headroom and better balance the signal levels when switching from mic to line. Both route to the mic / line switch and then to the input grid of the first tube stage which is a common cathode triode stage with the cathode un-bypassed to increase linearity. The output is capacitor coupled to the volume pot which then feeds the second tube stage, which feeds the output transformers and the 1/4" TRS balanced outputs. Pretty simple huh?
My belief is that simple sounds better, especially when implemented with the best quality modern components and very clean and well bypassed power supplies. The B+ and Filament voltages are just that, very clean and well bypassed. Each tube stage has a trio of low impedance high ripple bypass caps (68uf bypassed by 10uf bypassed by .47uf poly cap) for excellent isolation from the other gain stages and power reserve for impactful transient performance. You can see all the bypassing built into the circuit in the picture above.
As always, things don't go as planned. While testing I found that the original circuit design didn't translate exactly to the new layout. The planned for 12dB pad ended up being more like 40 due to a different mic input transformer primary impedance. The output transformers had too high a turn ratio rendering the output level too low so I ordered some Edcor 15K / 600 line transformers. The original design called for a 500K pot but since the new design has an un-bypassed cathode to improve linearity, the output impedance of that stage is much higher than the original design, which did have a bypassed cathode. This combined with the 500K pot was too high a driving impedance to overcome the miller capacitance of the second stage which rolls off the highs. Changing out the volume pots to 250K alleviated this problem while not affecting the gain much. The 6dB pad on the line input wasn't planned for and had to be added after evaluation. But all in all it went off pretty well I'd say!
Here's a pic of the final wiring. Unfortunately the box can't be rack mounted due to it's 18" width so it won't have 'rack ears' but I'm sure Paul will find a good home for it!
Here's a look at the front panel switches and pots & associated wiring:
That's all for now but I will add photos of the finished product when the faceplate arrives!


